

articles/Media/aperture2workflowoptions-page3
Aperture 2 - workflow options - part 3 of 1 2 3
Published 01/10/2008
by Uzair Kharawala
Need for Speed
Event photography is a big part of our business. When we needed to print images on-site at an event, we really did struggle to find a decent program on the Macintosh. However, all that changed when Aperture 2 arrived. We download, sort, rename, print contact sheets and then print the images from our dye-sub printer to whatever size we require. No matter how big or small the event is, whether it is a corporate ball for 100 couples or an equestrian event for 600 riders, Aperture 2 effortlessly and painlessly handles our workflow. Even tethered camera support is available, allowing the images to go straight from camera into Aperture 2.
Case Study: Cross Country Equestrian Event
At a very busy event we really do need our workflow to be at 100mph - 600 riders, four photographers shooting four different jumps, 6,000+ images...
This is where we make use of the 'Smart Folders' in Aperture 2. One Smart Folder is created for each photographer, the criterion usually used is the photographer's name as a keyword. Upon receiving the CompactFlash card from say 'Photographer 1', this is entered as a keyword and all images from that CF card are imported. These images will automatically show in the Smart Folder named 'Photographer 1'. Now to make contact sheets of all the images as small thumbnails so clients can see their images and select the ones they like. All the images are selected and then printed on a '9-up Contact Sheet'. This will place nine images on a 9"x6" print.
Once the printing is done, we press '1' with all the images selected; this will rate all these selected images as '1' star. Now the next CF card comes from the same photographer, the images are imported with the keyword 'Photographer 1' and they all go into the Smart Folder of Photographer 1. Only the new images need to be printed as contact sheets, so a quick search of 'unrated' images is done; this shows up only those which are not rated '1' and are unrated. All these images are selected, printed and then rated as '1'. The same is applied to all the other photographers. A very sophisticated workflow, with a simple solution.
Indoor Equestrian Events
The winter season sees all the events go indoors. Show jumping and dressage events are the ones which we cover mostly. However, the lighting is not ideal and in many cases not sufficient. Tungsten lighting is usually used at these arenas which gives a very 'orangey' cast to the images. Once all the images are shot and imported into Aperture 2, we correct one of the images, lift the settings from it and can apply them to dozens, or even hundreds, of images at the same time with the 'Lift' and 'Stamp' tool, saving invaluable time and with no need to correct each and every image individually.
In my opinion, I don't think there is any other professional workflow application which offers such ease for managing, editing, sorting, previewing and outputting in a very user-friendly interface. There are many other powerful features which I have not even discussed, but which are there in Aperture 2 to make our workflow a lot easier.
Case Study: Corporate Event
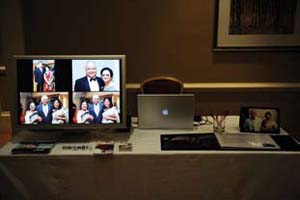
Images of guests are shot as they arrive. Using Wi-Fi, the images are sent to a 'hot folder' which Aperture keeps a watch on and imports images directly into its library. This is real-time and as soon as the images are shot, the couple are requested to view them on the monitor. The Mac Book Pro has an additional 30" Apple display attached to it, on which only the full screen image is shown to the client without any palettes or the Aperture interface. We can also display multiple images to the client at the same time so they can choose which they like.
There are pre-set sizes saved under the 'print' window. If we need to print a contact sheet of nine images as thumbnails, we select the images and select the nine-up contact sheet or when a customer's 9"x6" print needs to be printed, only one image is selected and then the 9"x6" print option is clicked. It is a straight forward way of printing on-site.
Please Note:
There is more than one page for this Article.
You are currently on page 3
- Aperture 2 - workflow options page 1
- Aperture 2 - workflow options page 2
- Aperture 2 - workflow options page 3
1st Published 01/10/2008
last update 11/11/2019 11:46:30
More Media Articles
There are 0 days to get ready for The Society of Photographers Convention and Trade Show at The Novotel London West, Hammersmith ...
which starts on Wednesday 14th January 2026

Society of International Media & Press Photographers (SIMPP) is a trading name of BPPA Ltd
Clwyd Chambers, Clwyd Street, Rhyl, Denbighshire, LL18 3LA, UK
BPPA Ltd Company Reg 0392 2894
VAT number 790 4289 05
Tel: 01745 356935
Corporate Partners


Newsletter
Subscribe to the Societies Newsletter. Subscribe here.
Privacy. - Partner Societies - London Photography & Video Show - Europe's Largest 'All-Welcome' Photographic Convention
© Copyright 2000 - SICIP | Society of Media and Press Photographers B.P.P.A. Limited All Rights Reserved.
Updated 11/11/2019 11:46:30 Last Modified: Monday, 11 November 2019