
Proof Beyond Reasonable Doubt 2008 - page 2
Mike McNamee revisits the topic after a five year gapCross Rendering for CMYK proofing
It is quite common for a pre-press provider or printer to ask for an RGB image so that they can control the conversion to CMYK to their common standard. In these circumstances it is still imperative that a hard copy goes with the job so that everyone knows what they are looking at. One way is to cross render the image into a proof which takes the RGB data, converts it to a CMYK simulation and then uses the inkjet’s RGB-based profile to ensure the accuracy of delivery of the CMYK mimic. Photoshop may be set up to do that (see the call-out boxes) and even mimics the off-white base tone of the standardised print stock. When you soft proof using the cross render do not leave white margins on screen or on the paper proof. If you do, it will look a dull beast in comparison to its RGB cousin – that is a fact of life, we are making a simulation of the eventual output which is never going to be as bright as an illuminated inkjet!
Press Simulation – Cross Rendering
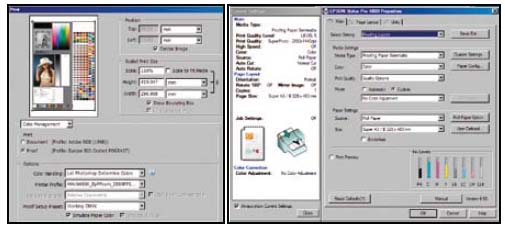
The Sequence in Detail – proofing to Euroscale Coated FOGRA 27
1. Set up Photoshop Color Settings with Europe Prepress 2 Defaults
(ie FOGRA 27 for CMYK)
2. Click View>Proof Setup then select Working CMYK
3. Click File>Print with Preview and set up the dialogue box as shown,
namely
Show More Options, Color Management
Proof Set up (your working CMYK)
Print Space – your bespoke RGB-based printing profile for your local,
proofing printer.
Intent – Absolute Colormetric
4. Click Page Set Up then Printer. Check you have the right printer in the
drop-down list, then click Properties. Click Advanced, set the media type,
Select the '¤ No Color Adjustment' radio button and select the resolution
from the drop-down list.
Proofing with Adobe Products
The common colour architecture of the Adobe product range means that an
image printed from Photoshop should match that same image printed from
Illustrator, InDesign or Acrobat. However, to do so, the colour must be
managed in an identical way from all applications. Adobe Bridge has a button
in the Edit menu drop-down called 'Creative Suite Color Settings' from where
all the colour management settings may be synchronised.
Application Set-up
For printing in the UK you should set up your colour to use European Prepress 2 Defaults (in Photoshop; Edit>Color Settings>Settings>Europe Prepress 2 Defaults). This will give you Adobe RGB (1998) as your RGB colour working space and deliver better separations to CMYK, especially in the cyan part of the gamut. Presently the setting implements the FOGRA27 CMYK profile.
Next you should have available, profiles for your own printers and for the press you are trying to simulate (now you have to decide if you really want FOGRA 27, you may prefer FOGRA 39 or even an American SWOP setting – you may need to take advice from your printer on this one). It is advisable to proof to a standard profile (ie a universal one) rather than a press profile which may not even be available. If you have neither, you can obtain profiles for your printer/paper combination from the manufacturers’ websites or pay to have then made as bespoke profiles for your own set-up. The latter course is the most accurate by some way. Your press may be, as yet, unspecified or may not have profiles. Either way, you should talk to somebody ahead of deciding, even if it is only to a more experienced colleague! There are arguments for not profiling a CMYK press, but to provide average conditions and, to this end, using the Photoshop SWOP or Euro Prepress defaults is OK for many jobs. Specifying a generic profile or even no profile for a CMYK job is less risky than not providing a profile with an RGB image. In the former you will still get close, in the latter anything can happen and frequently does! When choosing your CMYK settings you should decide between 'coated' and 'uncoated' paper stocks as this makes a huge difference. This magazine is printed on coated stock, weekly magazines are often printed on lower quality, coated stock and newspapers are printed on uncoated stock. The quality degrades in the same order.
To RIP or Not To RIP?
For general photographic or fine art output, a Raster Image Processor (RIP) may or may not aid the cause. They are expensive (some cost many thousands of pounds) and if you only want to nest sets of images then other solutions such as QImage may be obtained at fractions of the cost. For proofing though, using a RIP expertly can move you on to the next level of precision. In our experience RIPs only increase accuracy when you spend a lot of time setting them up and if your goal is a pleasant rather than accurate image the RIP will not particularly assist. For the ultimate in precision proofing the GMG System seems to have no rivals despite what other RIP providers would like you to believe. It is also noticeable that the majority of certified RIP solutions tend to be built around the Epson printer range although they are also available for the high-end, wide-format Canon and HP printers.
Pre-Flighting
Pre-Flighting is an essential part of the proofing process, especially from a DTP application. Both InDesign and Acrobat Pro have first-rate pre-flighting and the pre-flight is followed by an offer to package your layout, ready to send to the printer. This assembles a new folder containing all your linked files, the required fonts, the InDesign layout document and a template for a text file in which you can add your name, telephone number and any special instructions for the printer. It really does take the strain out of sending documents away especially if it is something that you rarely do or you are new to business. Today much of the input to a printing company is delivered in PDF format by disc or ftp transfer. The easiest protocol to use and follow is that provided by the Periodical Publishing Association, called 'Pass4Press' (www.pass4press.com) – simply download the paperwork and follow the recipe.

Society of International Media & Press Photographers (SIMPP) is a trading name of BPPA Ltd
Clwyd Chambers, Clwyd Street, Rhyl, Denbighshire, LL18 3LA, UK
BPPA Ltd Company Reg 0392 2894
VAT number 790 4289 05
Tel: 01745 356935
Corporate Partners


Newsletter
Subscribe to the Societies Newsletter. Subscribe here.
Privacy. - Partner Societies - London Photography & Video Show - Europe's Largest 'All-Welcome' Photographic Convention